Message automations help you save time and ensure consistent communication with your guests, owners, and team members. Automatically send the right message to the right recipient at the perfect moment by building a communication schedule that aligns with your reservation lifecycle.
Terminology
- Message automation: The visual schedule or framework you use to set up automated communication. Reservation conditions determine which reservations enter the flow.
- Automated messages: The individual messages that comprise the message automation. Message conditions determine if and when an individual message is sent.
- Reservation and message conditions: Together, these work as a two-step filter. Reservation conditions determine which reservations enter the automation. Message conditions determine which specific messages are sent within that automation, and when.
|
For example: You create a message automation for the "Seaside Villa" listing with the Channels and sources condition set to "Airbnb". Reservation conditions: The booking source must be Airbnb, and the listing must be "Seaside Villa." A reservation made via Booking.com won't trigger the automation. Message conditions: Determine if a specific message within the automation is sent.
|

Understanding message scheduling and expiration
Message automations are added to reservations upon confirmation. If a reservation is confirmed after a message's scheduled time, the message sends immediately upon confirmation.
|
For example: A message is scheduled for 1 day before check-in. If the guest books 8 hours before check-in, the message sends immediately. |
Automated messages sent to cleaners don't display in the Inbox. You can track all updates to your message automations in the activity log.
Message scheduling
Automated messages are scheduled using the listing’s default check-in/check-out time. If an arrival or departure time changes, Guesty automatically reschedules the messages.
Note:
Airbnb reservations follow the listing’s default check-in and check-out times, even if you alter the ETA or ETD in Guesty.
When you activate a new automation, Guesty schedules messages for all matching reservations, including those created earlier. Guesty only triggers messages if the scheduled time is in the future. If a time has already passed, the message is skipped.
For example, if a message is set to send "at booking confirmation" and you activate the automation today for a reservation confirmed yesterday, that specific message is skipped.
Automated messages are still sent to reservations booked before connecting to Guesty.
Message expiration
If you disable an automated message before its scheduled sending time, it expires once that time passes. You can view expired messages in the Inbox automated messages widget under "History".
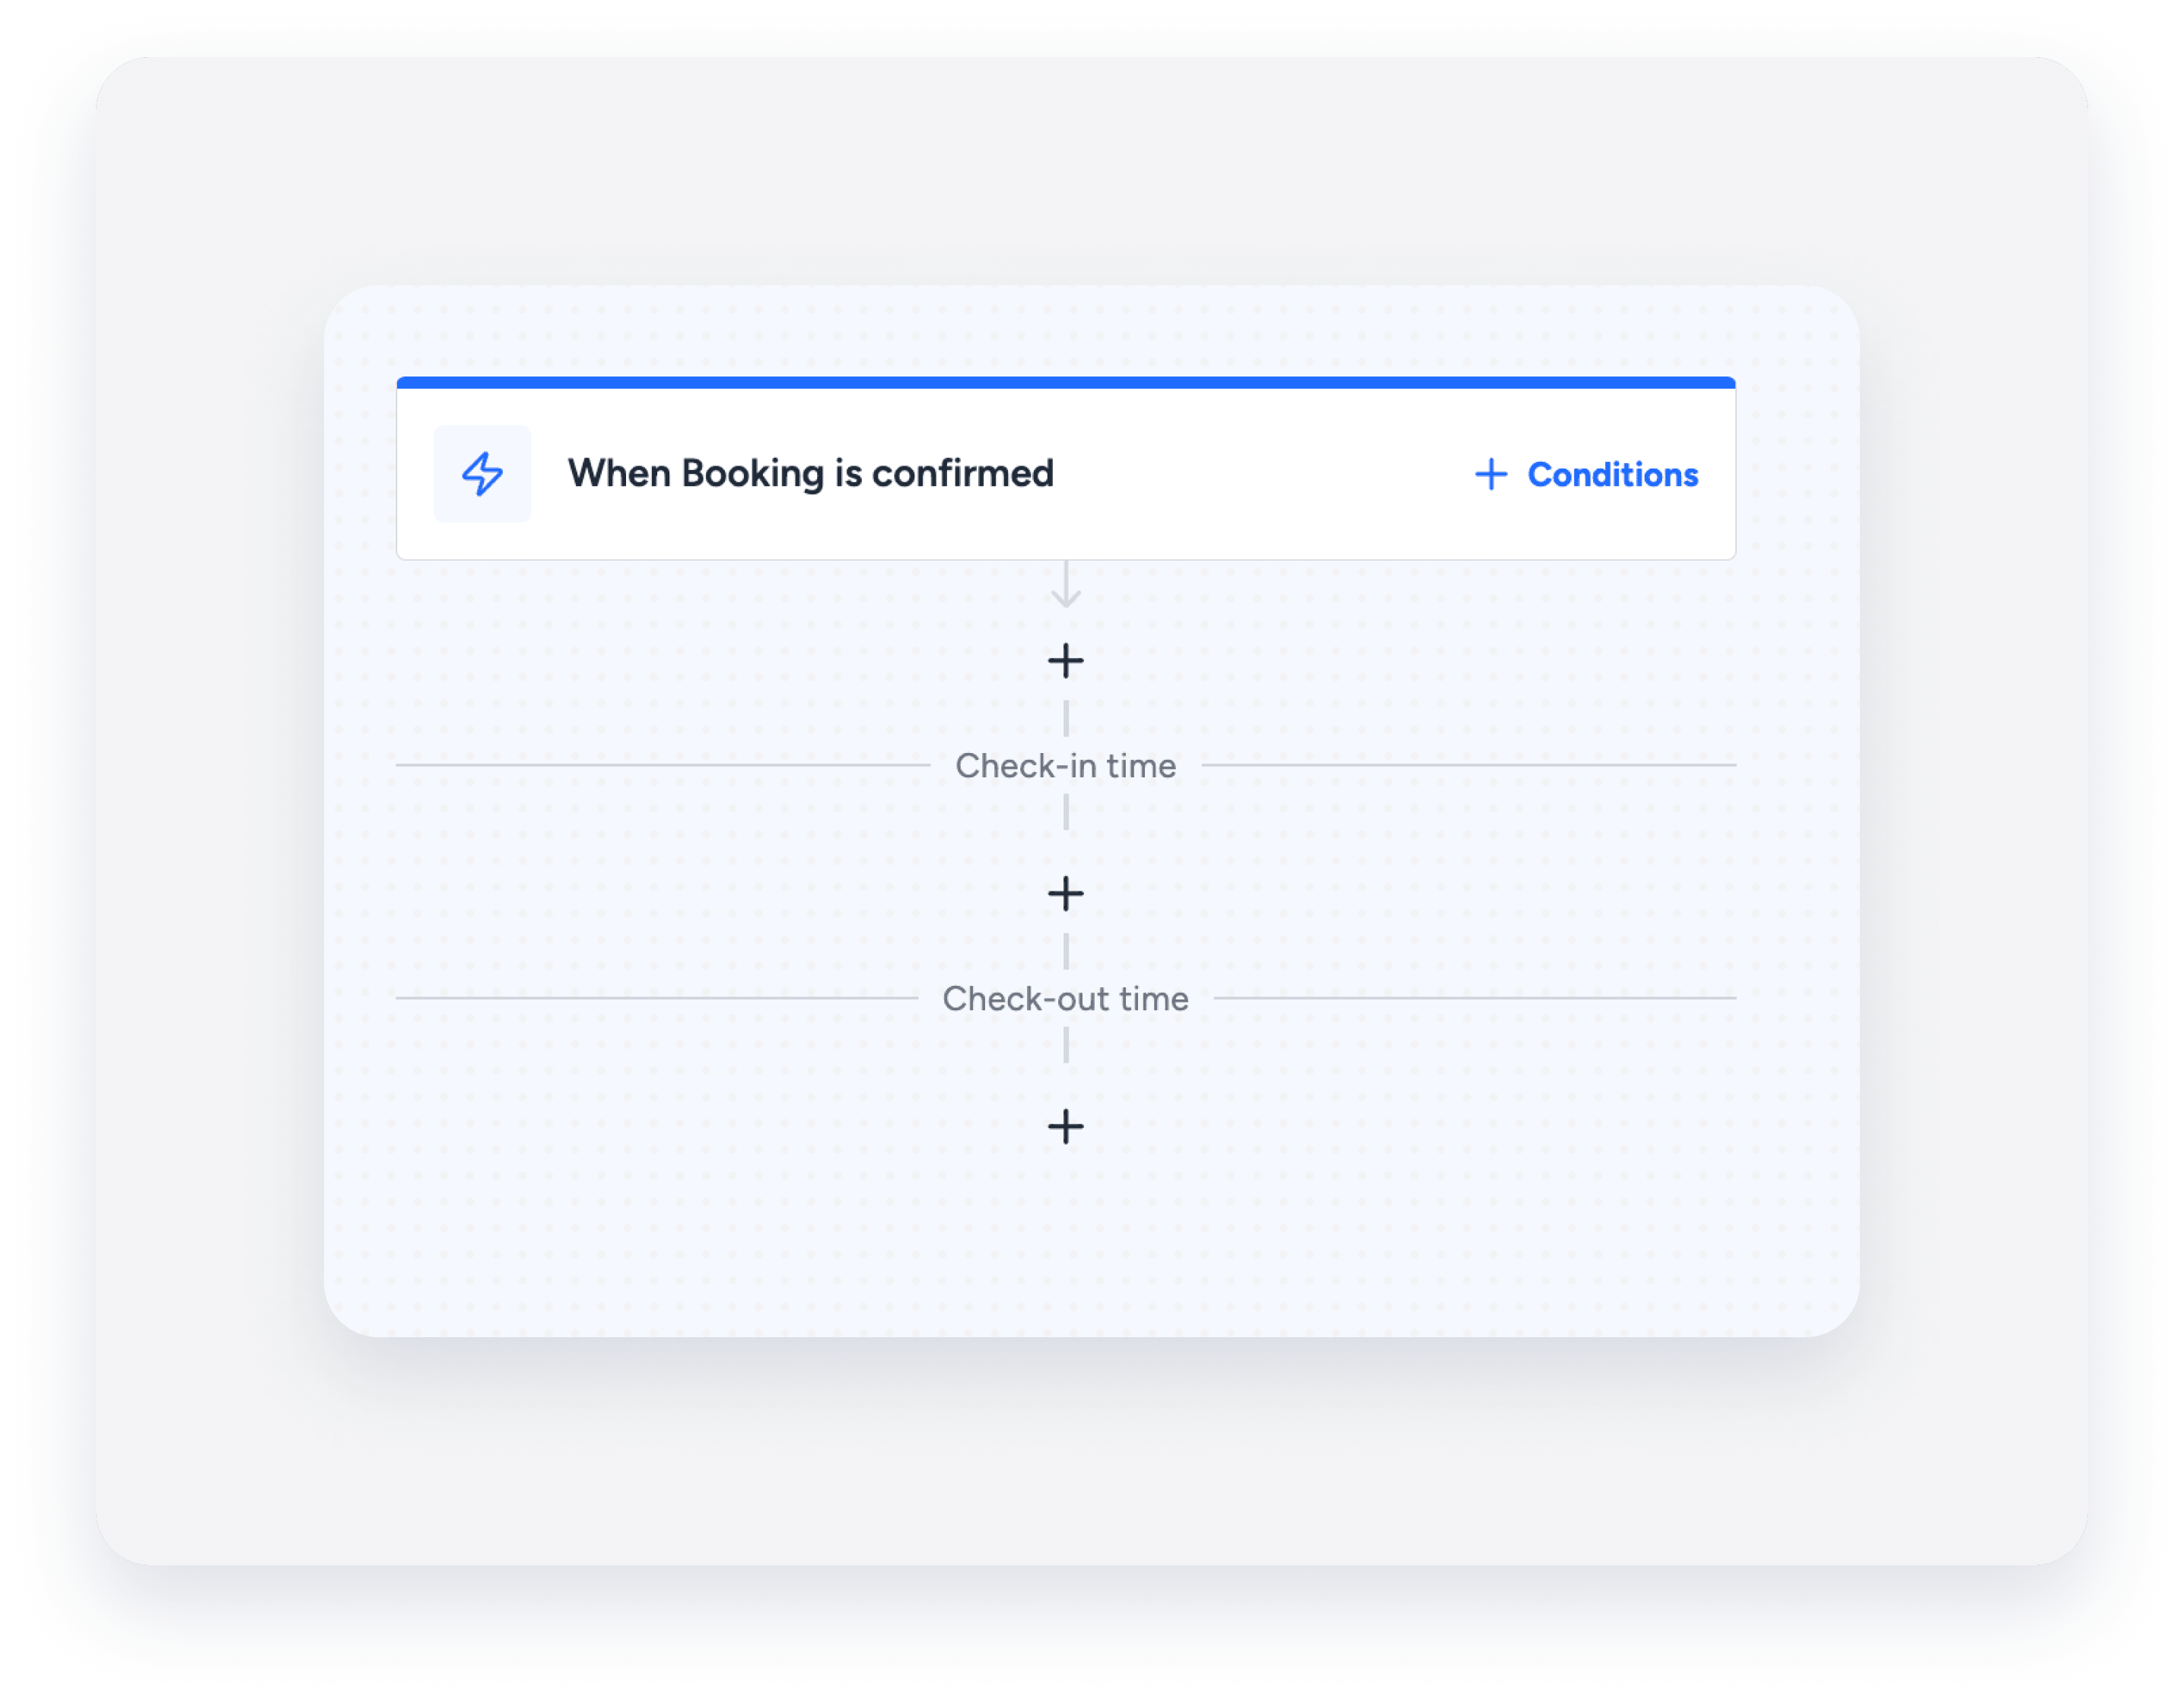
Create a message automation
Follow the instructions to create, edit, or delete a message automation.
Step by step:
- Sign in to your Guesty account.
- In the side navigation menu, click
 Operations to open the dropdown menu.
 - Select Automated messages.
- To create your first message automation, click Create your own automation. To add a new message automation, click Add message automation.
- Choose how to create your automation:
- To use a message automation template, click Use template next to the relevant automation.
- To create a new message automation template, click Add custom automation in the top-right corner and select the relevant option.
- In the top-left corner, click
 to change the message automation's name. You can rename it at any time.
 - Define the reservation conditions:
- If you are using a template, click on the first block of the timeline to set up your message conditions.
- If you are creating a new message automation, click + Conditions on the first block of the timeline to set up your message conditions.
- If you are using a template, click
- Click Save.
- To create a message, click the + icon on the reservation timeline to add a new message.
- To edit a message, click on the relevant message to make the necessary changes.
- To delete a message, click on the relevant message and then click Delete message. In the pop-up, click Delete to confirm.
- To edit a message, click
- Set up your message.
- Click Save.
- Save the message automation accordingly:
- For a new message automation, click Activate automation if it is ready, or click Save as draft to activate later.
- For an active message automation that was edited, click Save to reactivate it automatically, or De-activate to return it to draft status.
- For a deactivated message automation that was edited, click Activate automation to activate it, or Save to keep as a draft and activate later.
- In the pop-up, confirm the action.
Set up your automated messages
Create multiple automated messages within a message automation. Define when each message is sent, who receives it, and how it's delivered.
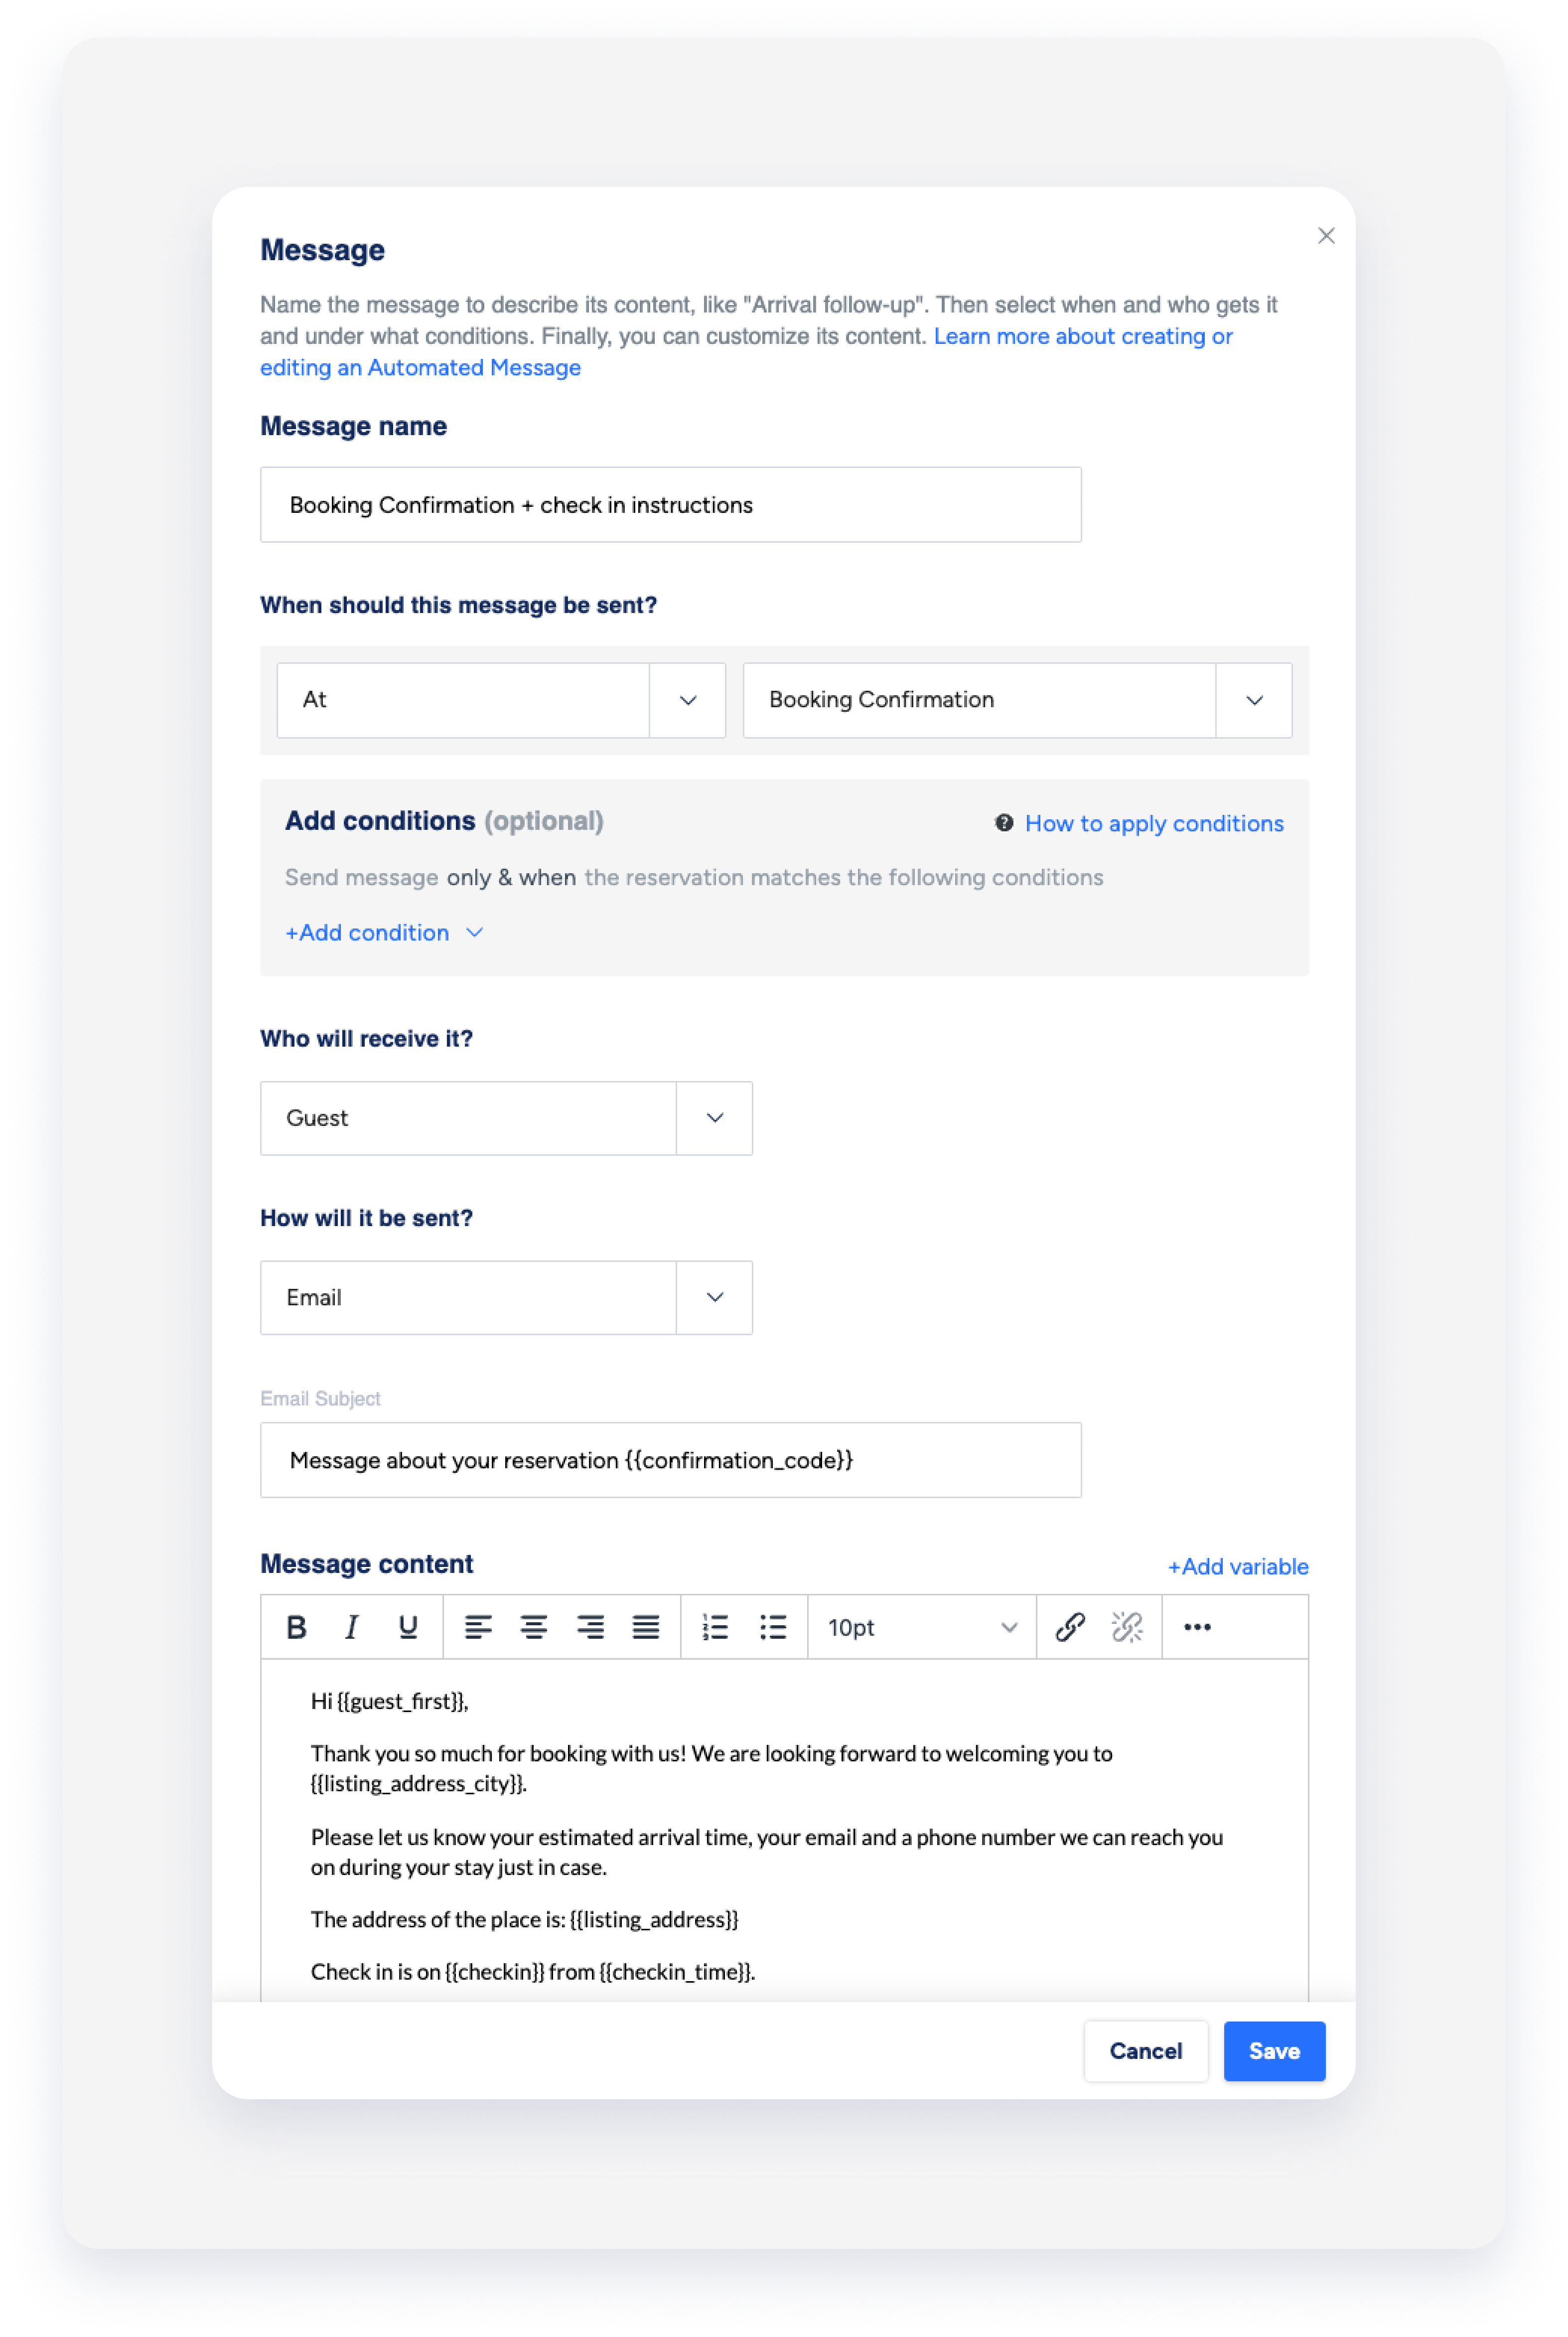
The name of the message is for internal use only. It will appear in the automation timeline and in the Inbox auto messages widget.
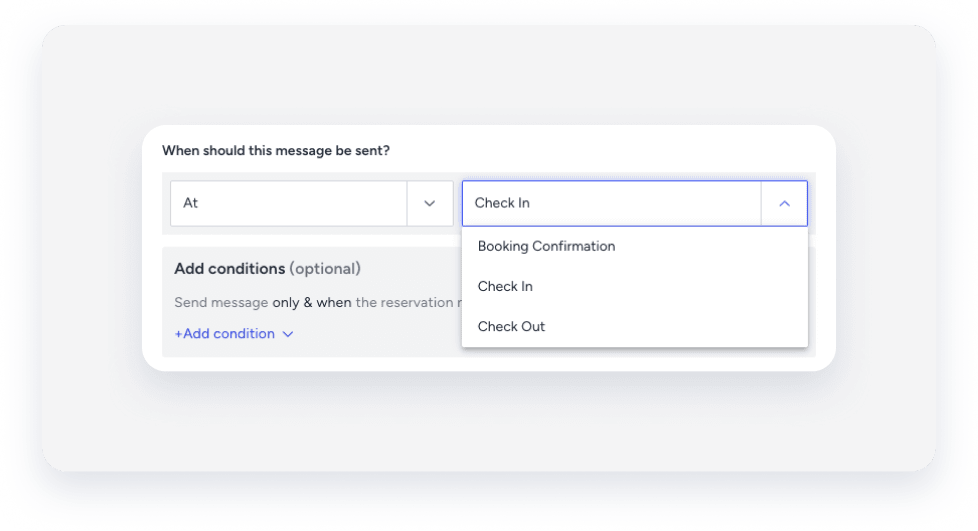
Define the trigger for the message. For example, set it for the time of booking confirmation, or 1 day before check-in.
Use message scheduling to send automated messages on specific days of the week.
Message scheduling only applies to messages sent between check-in and check-out. Sending stops at check-out.
The "When should this message be sent?" setting determines the schedule's start date. For example, if you set the message to send "1 Day After Check-in" and schedule it for Monday and Wednesday, the message sends every Monday and Wednesday starting one day after check-in.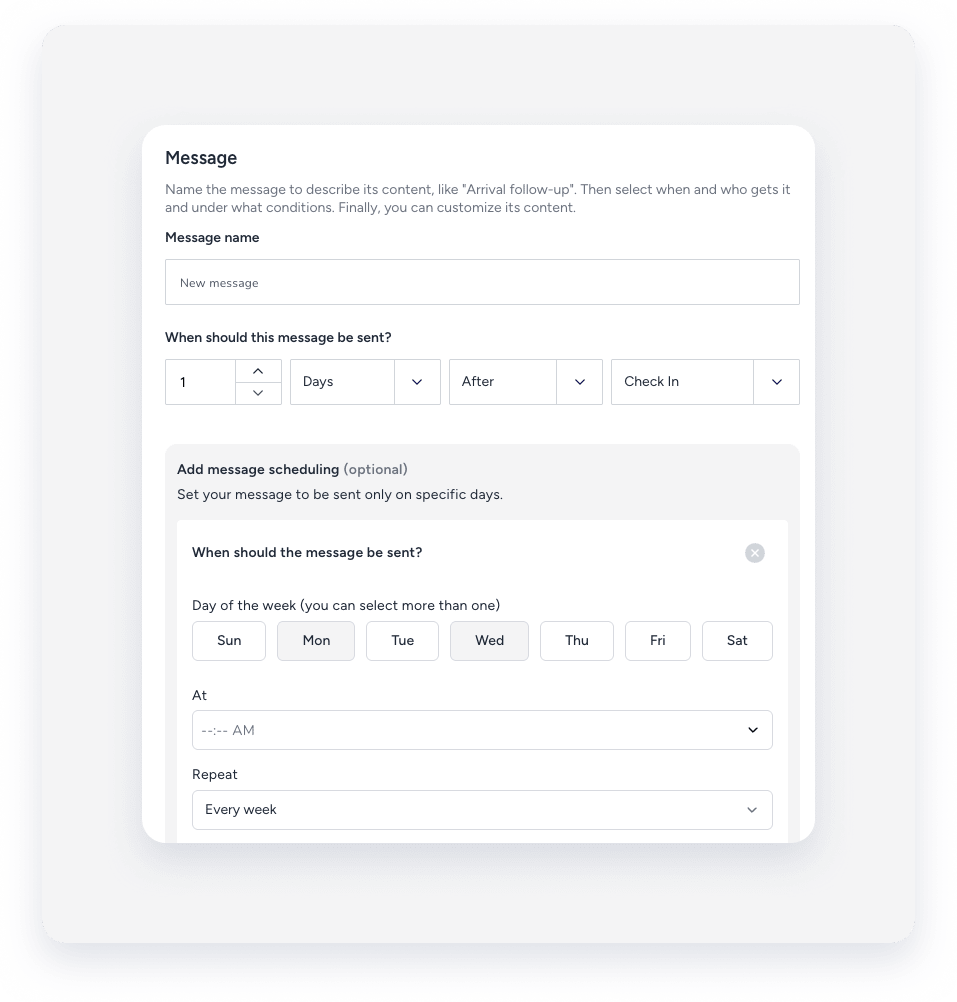
Step by step:
- Set the message to send on a constant day for all reservations that trigger this automation flow. You can choose one or multiple days.
- Set the time of day these messages will be sent.
- Set how often they repeat (once a week or once a month).
Set the message conditions that a reservation must meet to receive the message.
For example, add a condition that triggers the message only if the reservation has been fully paid.
Recipients can include guests or contacts.
Choose how to send a message: via booking channel, email, or SMS.
- If you choose email, include an email subject line.
- Ensure the guest has a valid email address or phone number in the contact details if the automated messages are set to be sent via email or SMS.
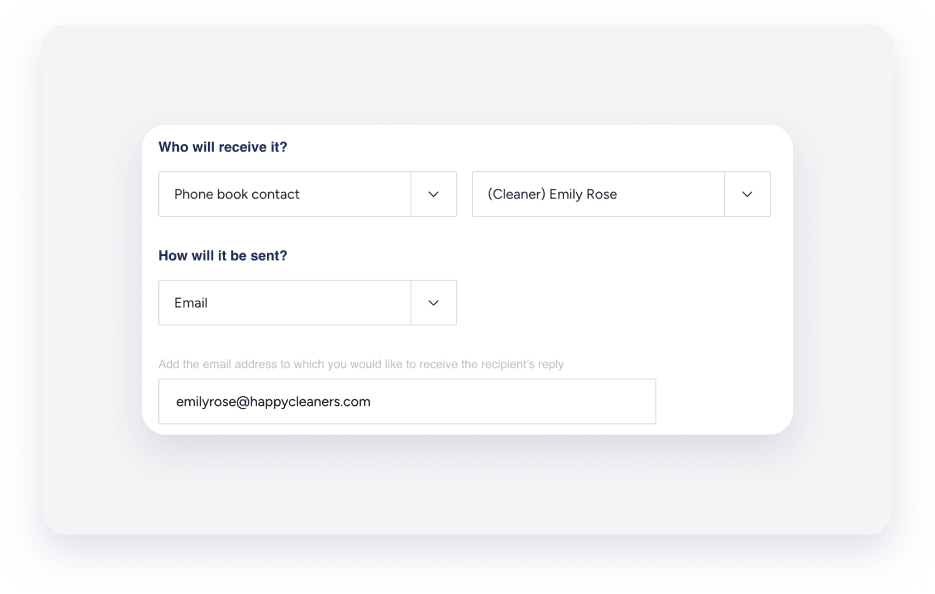
Non-guest recipients
Replies to automated messages from non-guest recipients aren't displayed in the Guesty Inbox. To receive replies to automated messages from non-guest recipients:
Step by step:
- Under "Who will receive it", select the relevant recipient group and recipient name from the dropdown menus.
- Under "How will it be sent", select Email.
-
Add the email address to which you would like to receive the recipient’s reply in the provided field.
Add the content of the message here.
- Messages can include variables to ensure personalized communication throughout the reservation timeline.
- Messages sent via email offer additional options, such as adding images, attachments, and HTML.
- Message formatting, such as bolding and italics, is only supported for messages sent via email.
- Airbnb, Booking.com, and Vrbo users can include up to 5 images in automated messages. The total size of all photos attached to a message is limited to 25MB.
- Click
 .
. - Drag and drop the images you want to send into the pop-up. Alternatively, click Browse, select the images from your computer, and then click Done. Images are automatically removed if sent to an unsupported booking channel.
- Click
Important:
- Be sure to click Save once your message is set up.
- You can't preview how an automated message will appear to guests before it's sent.
Activate or deactivate a message automation
Once you've created a message automation with at least one message, it must be activated.
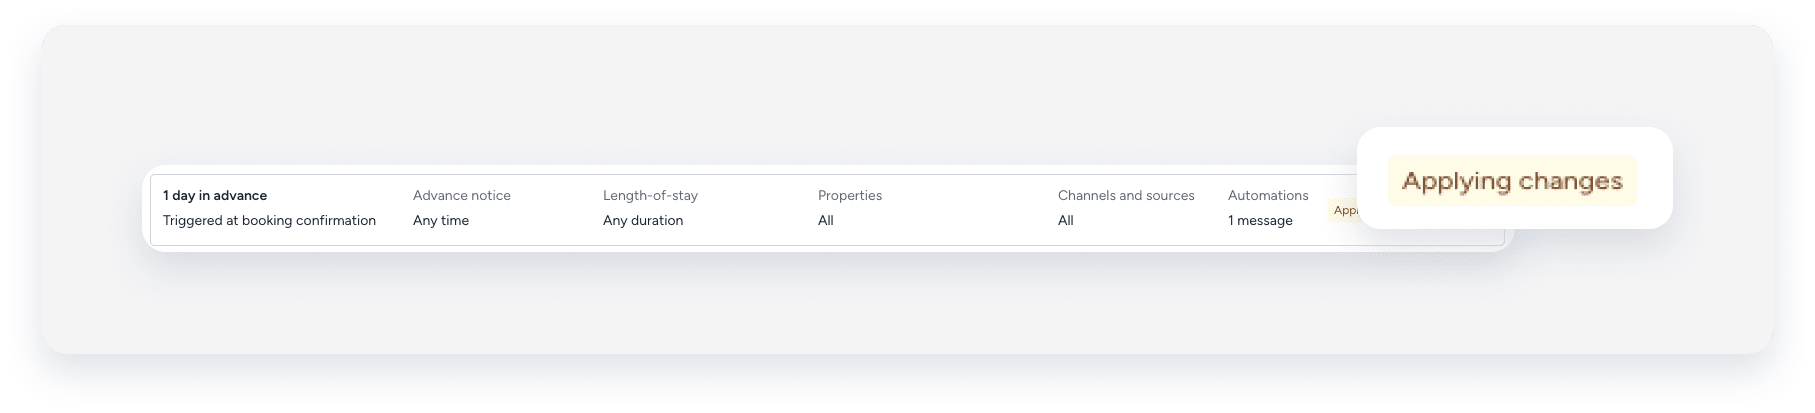
To activate or deactivate a message automation, switch on the relevant automation and confirm the action in the pop-up window.
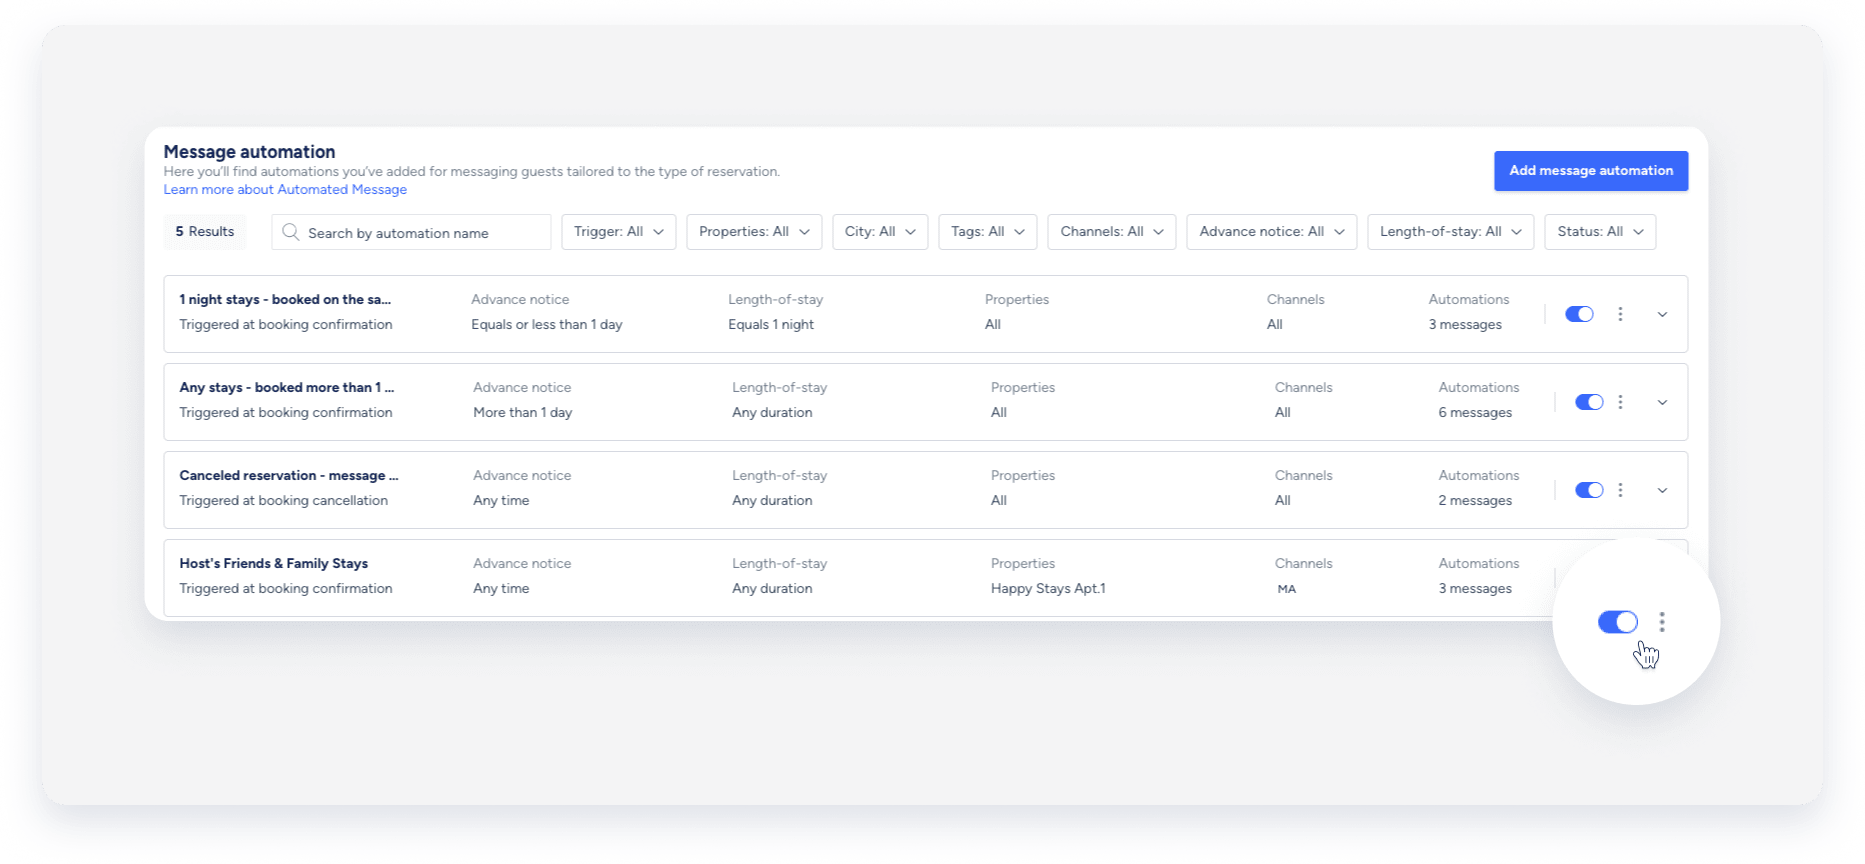
An activated message automation, along with its messages, will be added to all existing and future relevant reservations. A deactivated message automation, along with any messages that have not yet been sent, will be removed from all relevant reservations.
Note:
After activating or deactivating a message automation, allow a minute for the system to register the change. Taking immediate action may lead to unexpected behavior, such as duplicate messages being sent or changes not applying correctly.
Duplicate a message automation
Duplicate message automations to quickly set up new ones that mirror existing automations, including conditions and messages. This ensures consistency and accuracy across your communications without starting from scratch. You can duplicate a message automation as many times as needed.
To duplicate an automation, click ![]() to the right of the relevant automation and select Duplicate from the dropdown menu. You can edit the message automation as required, then click Save and activate if it's ready. To save it as a draft, click Save and activate it when it's ready.
to the right of the relevant automation and select Duplicate from the dropdown menu. You can edit the message automation as required, then click Save and activate if it's ready. To save it as a draft, click Save and activate it when it's ready.
Notify guests about reservation alterations
Only the first alteration to a reservation triggers the message. Subsequent changes won't trigger additional messages. Create a template and schedule it to send automatically when a reservation is altered.
The following reservation changes will trigger the automated message:
- Reservation status
- Number of nights
- Number of guests
- Assigned listing
- Adding or updating the ETA or ETD
For check-in or check-out changes, the alteration must shift the reservation to a different calendar day in UTC to trigger the message. Minor time adjustments within the same UTC calendar day do not trigger automated messages.
Note:
Scheduled automated messages are automatically canceled when a reservation is canceled. However, messages that are scheduled to be sent upon cancellation of a reservation will still be sent, but won't affect messages for altered reservations.
How reservation alterations affect automated messages
When a guest's reservation details are modified (such as check-in or check-out dates), the system handles automated messages differently depending on whether they have already been sent.
-
Already sent messages: Messages that have already been sent won't be sent again, even if the new reservation details would typically trigger them again.
You'll need to manually send any relevant messages again if needed.
For example:
If checkout instructions were automatically sent for the original checkout date and the guest later extends their stay, those checkout instructions won't be automatically resent for the new checkout date.
- Scheduled messages: Messages that haven't been sent yet will automatically reschedule based on the new reservation details.
Message statuses
Important:
A message automation can't be updated when it has one of the following statuses. You can make changes once the status disappears, which takes up to five minutes.
| Status | Explanation |
|---|---|
|
The message automation was created and activated. |
 |
This status is caused by one of the following:
|
